
Waterproofing your basement is an essential step in home maintenance. But where do you start? From evaluating the current condition of your basement, spotting potential water sources, to choosing the right waterproofing method and maintaining your waterproofed space, there are key steps to follow. Isn’t it time you learned how to protect your basement and ultimately, your home, from potential water damages? Stay tuned as we explore this homeowner’s checklist for basement waterproofing.
Assessing Your Basement’s Condition
 Before you plunge into the task of waterproofing your basement, it’s crucial to take a good look at the current state of the area.
Don’t just focus on apparent issues like visible water damage or leakage. Dig a little deeper. Examine the walls and floor for small cracks or fissures, as these could be potential entry points for water.
Look at the condition of your basement’s existing waterproofing if there’s any. Is it old, worn out, or damaged? Old waterproofing mightn’t function as efficiently as it used to, and it might be the cause behind your current water problems.
Pay attention to the overall state of your basement. Is it damp or musty? These could be signs of excess moisture, even if you can’t see visible water. Has the paint on the walls started to peel off? This could be another sign of water seeping into your basement.
Lastly, don’t forget to check the condition of the window wells, if there are any. Poorly sealed or damaged window wells can often let in water.
Identifying Potential Water Sources
Having thoroughly assessed the condition of your basement, it’s important to shift your focus to the root of the problem – the potential water sources. This is a critical step in the waterproofing process because the source of the water determines the best method to address it.
Start by inspecting the area around your home. Heavy rainfall or melting snow can pool around your foundation if your yard lacks proper grading or drainage systems. This can lead to water seeping into your basement.
Next, look for plumbing leaks. Faulty pipes can cause significant water damage. Check all pipes around your basement, including those leading to outdoor faucets and your home’s main water supply.
You should also inspect your home’s gutter system. Clogged or poorly functioning gutters can cause water to overflow and accumulate around your basement, creating a potential source of leakage.
Lastly, check for condensation. Basements are often cooler than the rest of the home, which can cause moisture to form on cold surfaces, leading to dampness.
Choosing the Right Waterproofing Method
Now that you’ve identified potential water sources, it’s time to choose the right waterproofing method for your basement.
You’ll find there are two main categories: interior methods, which we’ll discuss in depth in the next section, and exterior methods. Both have their merits and you should evaluate your specific needs, budget, and the severity of your water issue before proceeding.
Exterior waterproofing, also known as positive side waterproofing, is regarded as the most thorough solution. It involves excavating the soil around your basement walls and applying a waterproof coating or membrane.
This method prevents water from making contact with your basement walls, thereby preventing seepage.
Alternatively, you may want to reflect on interior waterproofing methods, also known as negative side waterproofing.
These methods deal with water that has already penetrated your basement walls. While not as thorough as exterior methods, they can be more cost-effective and less disruptive.
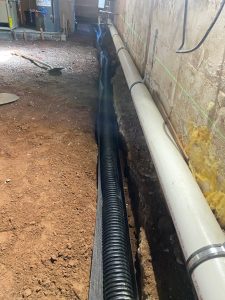
Implementing Interior Waterproofing Techniques
 Water seepage, a common nemesis for homeowners, can be effectively handled with the right interior waterproofing techniques. Once you’ve chosen the appropriate method for your home, it’s time to get down to business.
To start, clear the basement and prepare the area for treatment. You’ll want to make sure that all furnishings are protected and any cracks or leaks are identified.
Next, consider these interior waterproofing techniques:
- Sealants: These are applied to the walls and floors to block moisture. They’re typically made from silicone, polyurethane, or acrylic.
- Waterproof Paint: This acts like a sealant but with the added benefit of improving the aesthetics of your basement.
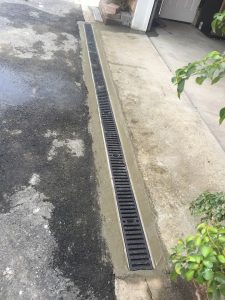
- Interior Drainage System: This involves installing a system to redirect water away from your basement.
- Sump Pump Installation: If your basement is prone to heavy flooding, a sump pump can remove excess water.
- Dehumidifier: This helps to control humidity levels, preventing dampness and condensation.
Each technique has its pros and cons, so it’s important to pick the one that suits your specific situation.
Don’t be afraid to call in a professional if you’re unsure – it’s better to get it right the first time.
Maintaining Your Waterproofed Basement
Once you’ve waterproofed your basement, it’s important to keep up with maintenance to guarantee its long-lasting effectiveness.
Regular inspections are significant. You need to routinely check your basement for any signs of water damage, such as dampness, mold, or foul odor. Don’t ignore even the smallest crack or leak, as over time they can lead to significant issues.
Another key aspect of maintaining your waterproofed basement is to regularly clean your gutters and downspouts. They play an essential role in directing water away from your home’s foundation. If they’re blocked with debris, water can overflow and seep into your basement.
Also, be mindful of your landscaping. Slope the ground away from your home to prevent water from pooling around your foundation. Keep plants and shrubs at a safe distance, as their roots can cause cracks in your foundation, providing an entry point for water.
Lastly, always keep an eye on your sump pump if you have one. Test it periodically to verify it’s functioning correctly. A malfunctioning sump pump can lead to basement flooding, particularly during heavy rains.
Now you’re equipped with a thorough checklist for waterproofing your basement. Start by evaluating the state of your basement, identifying potential water sources, and choosing the right waterproofing method. Then, implement interior techniques like sealants and sump pumps. Remember, maintenance is key, so regularly inspect the area, clean your gutters, and guarantee proper drainage. By following these steps, you’re on your way to a damp-free, protected basement, safeguarding your home’s value and your peace of mind.